Citrix Receiver Installation for Computers
1. Make sure you have Internet Explorer 10 or higher or Safari 6 or higher for Mac
2. Go to the Virtual Desktop link under either Staff or Student links, use your computer login and password
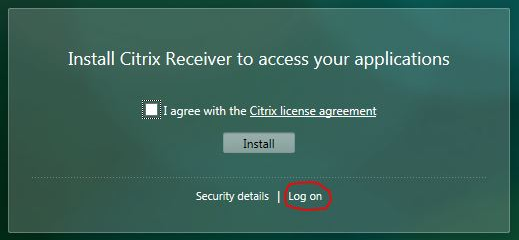
3. You may be prompted to install the receiver application. You do not need to install this, just click log on
4. If you had installed the receiver already, you may want to uninstall it if you are unable to connect. You can do that in the Control panel.
Using Citrix Desktop Virtualization on non-computer devices
1. Go to your App store and search for Citrix Receiver
2. Load the free App.
3. Start the Citrix Receiver App and choose add Account
4. Type xapps.tccsa.net for the address and choose next
5. Username and password is the same as your computer login
6. Domain: green-local.k12.oh.us
7. After putting in those settings choose 600-GREN Desktop
8. The virtual desktop should load now.
Troubleshooting tip: If your screen does not auto fit correctly and looks distorted, at the top of the screen click the tab, then click home, tap on the icon in the middle of the screen and disconnect. You can reconnect by tapping the 600-GREN icon again.
For iOS devices:
1. Go to your App store and search for Citrix Receiver
2. Load the free App.
3. Start the Citrix Receiver App and choose add Account
4. Choose option from the lower left and manual setup.
5. Type xapps.tccsa.net for the address
6. Make sure Access Gateway is checked and check Enterprise Edition
7. Username and password is the same as your computer login
8. Domain: green-local.k12.oh.us
9. After putting in those settings choose 600-GREN Desktop
10. The virtual desktop should load now